An underfloor heating system that runs warm in some places and cold in others is trying to tell you something. This guide walks through the real causes of cold spots, how they are diagnosed, and the point at which a cold patch stops being a balancing niggle and starts looking like a leak under the floor.
Underfloor heating is supposed to feel even. You walk across a room in socks and the warmth is there under every part of your foot, corner to corner, without hot streaks or cold bands. So when part of a floor stays stubbornly cool while the rest is comfortable, it is a genuine sign that something in the loop, the manifold, or the water itself is not behaving. Cold spots are one of the most common complaints we hear about wet underfloor heating in London, and they range from a five-minute fix to a serious leak buried in the screed.
The frustrating part for most homeowners is that the symptom looks the same from the surface no matter what is causing it. A cold patch is a cold patch. What separates a trapped airlock from a cracked pipe is not what you feel through the floor, it is what the pressure gauge, the flow meters, and a thermal camera reveal once someone looks properly. This article explains the main causes, how each one is diagnosed, and the specific point at which a cold spot should make you think about a leak rather than a bleed valve.
How wet underfloor heating is meant to work
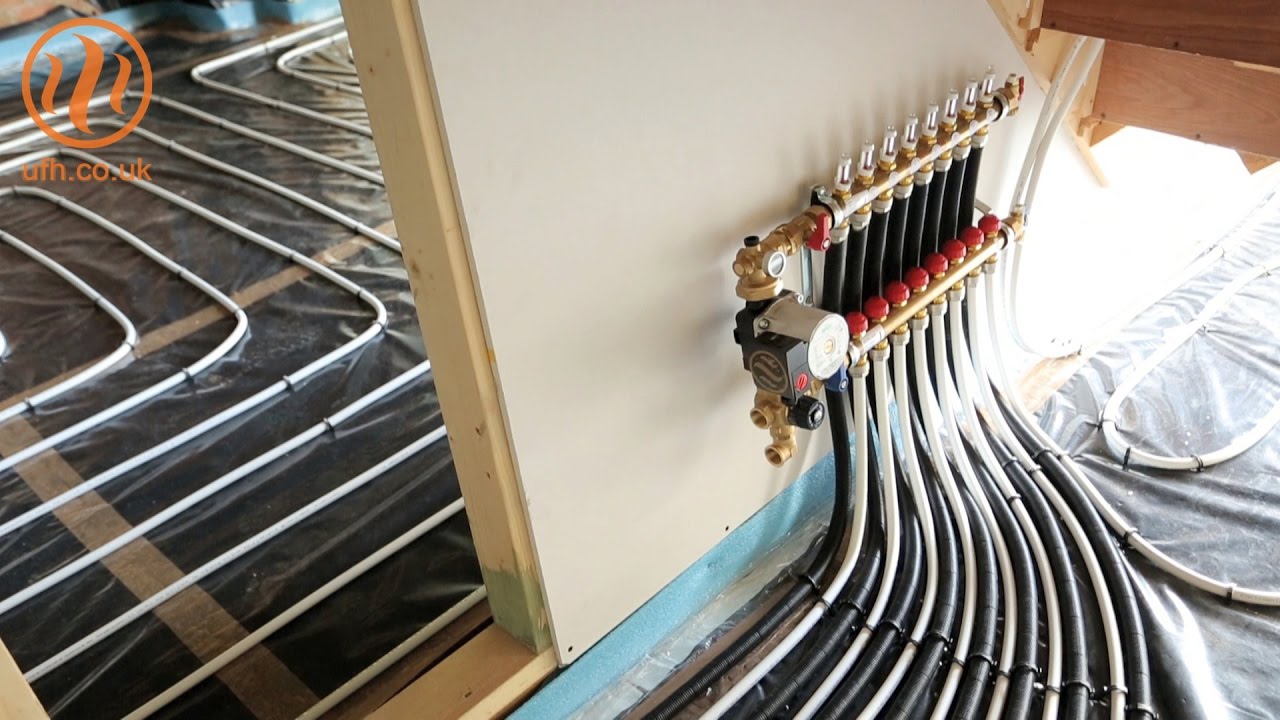
A wet, or hydronic, underfloor heating system circulates warm water through continuous loops of pipe laid in the floor, usually buried in screed or clipped into a spreader plate system beneath the finished surface. Each room, or sometimes each zone within a room, has its own loop that runs from a central manifold and back again. The manifold is the brass or steel bar, normally in a cupboard or utility space, where all the loops meet. It has a flow bar and a return bar, isolation valves, flow meters that look like little glass or plastic tubes, and often small electric actuators that open and close each circuit on demand from the thermostats.
A pump pushes warm water from the boiler or heat source through the manifold and out along the loops. A blending or mixing valve keeps the water at the correct lower temperature that underfloor heating needs, typically much cooler than a radiator circuit. When everything is balanced, each loop receives the right flow rate for its length and the heat spreads evenly across the whole floor. A cold spot means that even heat distribution has broken down somewhere between the manifold and the pipe under your feet.
The main causes of underfloor heating cold spots
Airlocks and trapped air
Air is the most common and least serious cause. Over time, air works its way into the system through fresh water top-ups, minor seepage at fittings, or gas produced by internal corrosion. Because the loops rise and fall as they follow the floor, air can collect at a high point and form a bubble that water struggles to push past. That section of pipe stops circulating properly and the floor above it goes cold, often in a band or a patch that lines up with the pipe run rather than the shape of the room.
Airlocks are usually cured by bleeding and flushing the affected loop at the manifold, one circuit at a time, so that fast-moving water carries the trapped air out. Many manifolds have drain and fill points designed for exactly this. If the whole system has gone sluggish, it may need a proper power flush or a controlled purge rather than a quick bleed.
Sludge, debris and blockages
Central heating water picks up magnetite, a black iron oxide sludge, as steel and iron components corrode from the inside. In underfloor loops the water moves slowly and the pipes are narrow, so sludge settles and gradually restricts flow. A partially blocked loop delivers less heat and produces a cold area that tends to get worse over a season or two rather than appearing overnight. Blockages can also come from debris left during installation or from a collapsed or kinked pipe where flooring was later fixed down.
Fixes range from flushing the individual loop to a full system flush and the fitting of a magnetic filter and inhibitor to stop it recurring. If a pipe is physically crushed or kinked under the floor, no amount of flushing will clear it and the location has to be found before any repair can be planned.
A failing manifold actuator
Each loop that is under thermostat control usually has a small electric actuator sitting on top of its valve. When the room calls for heat, the actuator opens; when the room is warm, it closes. Actuators fail. A dead actuator that is stuck shut will keep its loop closed even when the thermostat is calling for heat, and that whole zone stays cold while neighbouring zones work fine. A stuck-open actuator can cause the opposite problem, with one zone overheating and stealing flow from the rest.
This is one of the easier faults to confirm. An engineer can check whether the actuator is receiving power, lift it off to see whether the valve pin moves freely, and test the wiring centre and thermostat that drive it. Actuators are inexpensive parts and are straightforward to swap once the faulty one is identified.
Pump and circulation problems
If the circulating pump is weak, seized, running at the wrong speed, or airlocked itself, the water simply is not moving with enough force to reach the far end of the longer loops. The result is often a cold spot at the extremities of the system, the rooms or corners furthest from the manifold, while areas close to the pump stay warm. A failing mixing valve can produce a similar pattern by feeding water that is either too cool to heat the floor or not blended correctly.
Diagnosis involves checking the pump speed setting, listening and feeling for proper circulation, confirming the flow meters are showing movement on each loop, and measuring the actual flow and return temperatures at the manifold. Pump and valve faults affect several loops at once, which helps separate them from a single-loop problem such as an airlock or a blockage.
Incorrect balancing
Balancing is the process of setting the flow meter on each loop so that longer loops get more flow and shorter loops get less, so every circuit delivers even heat. A system that was never balanced properly, or that was knocked out of balance after work on the manifold, will have some loops running hot and others cold purely because the water takes the path of least resistance. This is not a fault in any component, it is a setup issue, and it is very common in systems installed quickly or by someone unfamiliar with underfloor heating.
The fix is patient rebalancing at the manifold, adjusting each flow meter and allowing time for the floor to respond between adjustments. It costs nothing in parts but takes knowledge and a methodical approach.
A leak in a loop
This is the cause that matters most, because it is the one that gets worse and can damage the building. A pinhole or a split in a buried loop lets water escape into the screed or subfloor. As water leaves the system the pressure drops, circulation in that loop weakens, and a cold spot develops, often accompanied by damp, a musty smell, lifting flooring, or a boiler that keeps needing to be topped up. A genuine leak under the screed will not be fixed by bleeding or balancing, and chasing it as if it were an airlock only delays the real repair while the leak continues.
Symptom to likely cause
| What you notice | Most likely cause | Typical first step |
|---|---|---|
| Cold band or patch following the pipe run, system otherwise fine | Airlock in that loop | Bleed and flush the affected circuit |
| One zone completely cold while others work | Failed or stuck actuator, or a closed valve | Test the actuator, thermostat and wiring |
| Cold area that has slowly worsened over months | Sludge or partial blockage | Flush the loop, fit a magnetic filter and inhibitor |
| Far rooms or corners cold, near ones warm | Weak pump, wrong pump speed or mixing valve fault | Check pump, flow rates and blend temperature |
| Some loops hot, others cold, no obvious fault | Poor or lost balancing | Rebalance flow meters at the manifold |
| Cold spot with falling pressure, damp, or constant top-ups | Leak in a buried loop | Pressure test and thermal imaging before cutting the floor |
How to narrow it down yourself before calling anyone
There are a few honest checks a homeowner can make before deciding whether this is a job for a plumber. Look at the boiler or system pressure gauge. If the pressure is stable and sits where it should, a leak in the underfloor loop is far less likely and you are probably dealing with air, balancing, or a component. If the pressure keeps dropping and you find yourself topping the system up every few days or weeks, that is a warning sign that should be taken seriously.
Watch the flow meters on the manifold while the heating is running and each thermostat is calling for heat. A loop showing little or no flow when it should be open points to an airlock, a blockage, or a closed actuator on that circuit. Feel the flow and return pipes at the manifold for each loop; a healthy loop is warm going out and cooler coming back, and a loop that is cold on both sides is not circulating. These observations will not tell you the exact fault, but they help you and any engineer start in the right place.
What the DIY community generally agrees on
The consensus on UK home forums such as r/DIYUK and DIYnot is fairly consistent and worth repeating honestly. Most contributors treat bleeding an airlock and rebalancing the manifold flow meters as reasonable jobs for a confident, careful homeowner, since neither involves opening the sealed structure of the floor and both are reversible. Beyond that, the general advice tends to be more cautious. When people describe a persistent cold spot combined with dropping pressure or damp, the common recommendation is to stop guessing and get the system pressure tested rather than start lifting flooring on a hunch. There is also a widely shared warning against cutting into screed to find a leak by eye, because the entry point of water into the floor is often nowhere near where the actual breach in the pipe is, and exploratory digging frequently causes more damage than the leak itself. This lines up with how the problem is approached professionally.
When a cold spot means a leak under the screed
A cold spot crosses from annoyance to concern when it comes with loss of pressure. Underfloor heating runs as a sealed, pressurised circuit, so if the gauge is falling and you have ruled out a visible drip at the manifold or the boiler, water is escaping somewhere it should not, and a buried loop is a prime suspect. The tell-tale combination is a cold or unevenly warm area, a pressure gauge that will not hold, and often some secondary evidence such as a patch of floor that feels damp or cool, warped or lifting boards, discoloured grout, a musty smell, or an unexplained rise in water use.
The difficulty with a screed leak is that you cannot see it and its symptoms are misleading. Water tracks along the path of least resistance under the floor, so it can surface a metre or more from the actual hole. This is precisely why cutting the floor to look is such a poor first move, and why locating the breach accurately before any flooring comes up saves money, mess and time.
How professionals find the leak before cutting the floor
The whole point of professional leak detection is to avoid disturbing the floor until the source is known to within a small area. Two techniques do most of the work, usually together.
The first is thermal imaging. With the underfloor heating running under load, the warm water in the pipes creates a clear heat signature that a thermal camera can read through the floor finish. A trained eye can trace the loops, see where flow is present and where it is not, and identify the anomaly a leak creates, either an unusually warm pooling area where escaping warm water is spreading, or a cold break where circulation has stopped past the breach. Thermal imaging is completely non-invasive, nothing is opened or cut, and it turns an invisible problem into a visible map of the floor.
The second is pressure testing. The suspect loop is isolated at the manifold and brought up to a set pressure, then monitored. A loop that holds pressure is intact; a loop that steadily loses pressure has a breach. By isolating and testing loops individually, an engineer can confirm which single circuit is leaking rather than treating the whole floor as suspect. Tracer gas, a safe mix that is introduced into the depressurised loop and detected as it escapes, can be used alongside these methods to pinpoint the exit point very precisely on difficult jobs. Acoustic listening equipment can add further confirmation on pressurised pipework.
Used together, thermal imaging, pressure testing and, where needed, tracer gas turn a vague cold patch into a marked spot on the floor, often measured to within a small area. Only then does anyone consider lifting a finish or opening a section of screed, and the opening is kept as small as the repair allows.
What the repair typically involves
Once the breach is located, the repair is usually far more contained than people fear. A small, precise section of floor finish and screed is opened over the identified point, the damaged length of pipe is cut out and replaced or joined with an approved fitting, the loop is pressure tested again to confirm the fix holds, and the screed and finish are reinstated. Because the location work was done non-invasively first, the physical repair is targeted rather than exploratory, which is what keeps disruption and cost down.
What this typically costs
It helps to think in terms of typical UK trade cost-guide ranges rather than fixed figures, because every property and every fault is different. Simple work such as bleeding an airlock, swapping a failed actuator, or rebalancing a manifold sits at the lower end and is often a single short visit plus a modest part. A full system flush with a magnetic filter and inhibitor is a larger job priced by system size. Non-invasive leak detection using thermal imaging and pressure testing is a defined piece of work in its own right, and the eventual screed repair is priced separately once the scope is known. Getting the detection done properly first is what prevents the far larger cost of unnecessary floor damage from guesswork.
How we approach it in London
Our positioning on underfloor heating cold spots is deliberately straightforward. We lead with thermal imaging and pressure testing so the floor stays intact until the fault is genuinely understood. Our detection work is non-invasive, we operate on a no find, no fee basis for leak detection, and the fee is fixed and agreed at the point of booking so there are no surprises once we are on site. That means you can have a persistent cold spot investigated properly without committing to floor-up exploratory work, and without an open-ended bill.
If your cold spot comes with falling pressure, damp, or constant top-ups, treat it as a possible leak and have it looked at before it damages the structure. You can read more about how we handle these jobs on our underfloor heating leak detection in London page, our wider central heating leak detection in London service, and our guide to underfloor heating leak signs and repair.
Frequently asked questions
Can I fix an underfloor heating cold spot myself?
Sometimes. Bleeding a trapped airlock at the manifold and rebalancing the flow meters are reasonable jobs for a careful homeowner, because neither disturbs the floor and both are reversible. Anything involving a suspected leak, a blockage in a buried loop, or dropping system pressure is better left to an engineer, since guessing at those can cause damage and delay the real repair.
How do I know if my cold spot is a leak rather than an airlock?
Watch the system pressure gauge. An airlock or balancing issue does not cause the pressure to fall, so if the gauge is stable the cause is more likely to be air, sludge, a component, or balancing. If the pressure keeps dropping and you are topping the system up regularly, or you notice damp, a musty smell, or lifting flooring, treat it as a possible leak in a buried loop and have it pressure tested.
Will you have to dig up my floor to find the leak?
Not to find it. We locate the breach non-invasively first, using thermal imaging while the heating runs under load and by pressure testing each loop in isolation, sometimes with tracer gas for precision. The floor is only opened once the leak has been pinpointed to a small area, and the opening is kept as small as the repair allows.
Why is one whole room cold when the rest of the underfloor heating works?
A single zone going completely cold while the others are fine usually points to that loop being closed off. The most common reason is a failed or stuck manifold actuator that is not opening when the thermostat calls for heat, or a closed isolation valve. It can also be a blockage in that one loop. An engineer can test the actuator, wiring and thermostat quickly to confirm which it is.
How does thermal imaging find a leak in underfloor heating?
With the heating running, the warm water in the pipes shows up clearly on a thermal camera through the floor finish. This lets us trace the loops and spot the anomaly a leak creates, either a warm area where escaping water is spreading or a cold break where circulation has stopped past the breach. It is completely non-invasive and turns an invisible problem into a visible map of the floor, which is then confirmed by pressure testing.
What does underfloor heating leak detection cost?
We work to fixed fees agreed at the point of booking, so you know the cost before we start, and our leak detection is offered on a no find, no fee basis. Simple fixes such as bleeding an airlock or replacing an actuator sit at the lower end of typical UK trade cost-guide ranges, while non-invasive leak detection and any subsequent screed repair are priced as their own defined pieces of work once the fault is understood.