Water Stain on the Wall: Leak or Damp, and How to Tell
A water stain on the wall rarely announces what caused it. This guide shows you how to read the clues, tell a plumbing leak from penetrating damp, rising damp and condensation, and how professionals confirm the source before a single brick is disturbed.
A brown ring, a yellowing patch, a soft blister in the paint. A water stain on an internal wall is one of the most common reasons people first suspect they have a problem, and one of the most frequently misread. The stain itself is only the visible end of a story that usually begins somewhere you cannot see. Water travels, spreads and dries in ways that disguise where it started, so the mark on the plaster is rarely directly beneath the fault that caused it.
The question almost everyone asks first is the right one: is this a leak, or is it damp? The two demand completely different responses. A live plumbing leak is an active fault that will keep feeding water into the structure until it is found and fixed. Damp, in its various forms, is usually a longer-standing condition tied to the building fabric, ventilation or ground conditions rather than a burst or weeping pipe. Getting the two confused is expensive. People replaster over live leaks, or rip out plumbing chasing a problem that was really condensation all along.
This guide walks through how to read a wall stain like a professional would: what the height, shape, spread and location are telling you, how to run a few safe checks yourself, and how a proper investigation confirms the cause with moisture mapping and thermal imaging before anyone picks up a chisel.
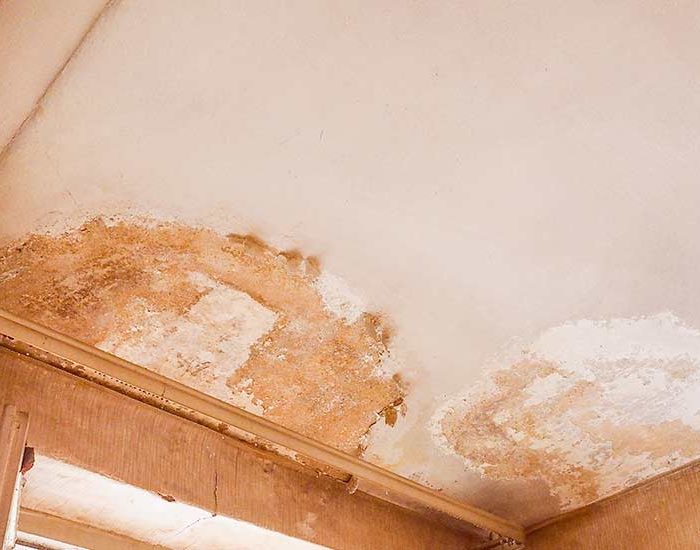
Start by reading the stain, not guessing at it
Before you touch anything, look carefully. A water stain carries a surprising amount of information if you know what to note. The four things worth recording are its height on the wall, its shape and edge, whether it is wet or dry to the touch, and what sits on the other side of that wall or directly above it.
Height on the wall
Height is the single most useful clue. Water obeys gravity, so where a stain sits relative to the floor and ceiling narrows the field considerably.
- Low down, within around 30 to 100cm of the floor, and fairly even along the wall: this pattern is classic of rising damp, where ground moisture is drawn up through the masonry. It tends to form a horizontal tide line rather than a single patch.
- High up, near the ceiling or in a top corner: think roof, gutter, flashing, or a leaking pipe in the floor void above. Water entering high can also be penetrating damp through a failed external wall or a chimney.
- Mid-wall, in a defined patch: this often points to a specific source behind or above that spot, such as a pipe run, a radiator tail, or a fault in the external wall at that point.
Shape, edge and colour
The border of a stain tells you how the water arrived. A clean plumbing leak from mains or heating pipework often leaves a fairly defined patch with a darker, tea-coloured ring at the margin where minerals and dissolved plaster salts concentrate as the water repeatedly wets and dries. Penetrating damp from outside tends to produce a more diffuse, irregular blotch that grows after rain. Condensation usually shows as a broader, cloudier discolouration, frequently with black mould speckling in the coldest spots such as corners, behind furniture and around window reveals.
Wet or dry, and does it change
Press the back of your hand to the wall, or better, use a cheap surface reading. A patch that feels actively damp, or that reappears within a day of drying, suggests a live source still feeding it. A stain that is bone dry and has not changed in months may be historic, the ghost of an old problem that has since been resolved. Whether a stain grows after rain, after a bath or shower, or seemingly at random is one of the most telling observations you can make, so it is worth watching it over a few days.
Location is half the diagnosis
Where the stain sits in the house matters as much as where it sits on the wall. Certain locations carry strong probabilities.
Near a bathroom or kitchen
A stain on a wall that backs onto, or sits below, a bathroom or kitchen shifts the odds firmly towards a plumbing leak. These rooms concentrate supply pipes, waste pipes, and appliances. A weeping joint under a bath, a failed shower tray seal, a slow drip from a basin waste or a pinhole in a heating pipe can all send water into the wall or floor void, where it tracks away before showing up on the plaster of the room next door or below. Shower and bath seals are among the most common culprits because the leak only happens when the shower runs, which is exactly why a stain that appears or worsens after washing is such a strong signal.
On or near an external wall
A stain on the inside face of an external wall, particularly one that darkens after wet weather, points towards penetrating damp. Rainwater is finding a route through the fabric: failed pointing, cracked render, a defective sill, a blocked or overflowing gutter, or a bridged cavity. The tell here is the weather link. If the wall dries out during a settled dry spell and reappears after heavy rain, the water is coming from outside rather than from a pipe.
Near a chimney breast
Chimney breasts are a special case and a frequent source of confusion. Staining around a chimney is often brownish and can carry a yellow or tarry tint from soot salts. It is commonly caused by rain entering a redundant or poorly capped flue, failed flashing where the stack meets the roof, or hygroscopic salts in old chimney plaster that draw moisture from the air. It is rarely a plumbing leak, though a heating pipe routed nearby can complicate the picture.
Low along the base of an internal wall
A tide line low on an internal wall away from any external face is unusual for rising damp and can indicate a leak in a pipe buried in or under the floor, a fault that quietly tracks along the screed and wicks up into the plaster.
A clue-to-cause table
The table below is a starting framework, not a diagnosis. Real walls often show more than one of these signs at once, which is precisely why confirmation matters.
| What you observe | Most likely cause | Notable feature |
|---|---|---|
| Low, even horizontal tide line up to roughly a metre high | Rising damp | Even band, often with a salt or crystalline edge; ground-floor only |
| Defined mid-wall patch backing onto a bathroom or kitchen | Plumbing leak | May worsen when a shower, bath or appliance is used |
| Diffuse patch on an external wall that darkens after rain | Penetrating damp | Clear link to wet weather; dries in settled spells |
| High stain near ceiling or top corner | Roof, gutter, flashing, or pipe in floor above | Traces downward from an entry point higher up |
| Broad cloudy discolouration with black mould in cold corners | Condensation | Worse in winter, behind furniture, around windows |
| Brown or yellow staining on or beside a chimney breast | Flue, flashing or hygroscopic salts | May smell sooty; rarely plumbing related |
| Damp patch that reappears within a day of drying | Live leak | Active source still feeding water in |
Why a leak behind a wall tracks downward and sideways
One of the reasons wall stains mislead people is that water almost never appears where it escapes. A pinhole in a copper pipe buried in a wall chase will release water that runs down the outside of the pipe, along the mortar bed, behind the plaster, and only becomes visible where it finally saturates enough material to discolour the surface, often a good distance below and to one side of the actual fault.
This downward and lateral tracking is why opening the wall directly behind a stain so often reveals dry, sound pipework, and why guessing leads to unnecessary damage. Water follows the path of least resistance through the structure: down cavity faces, along timber, across the top of a damp-proof course, through the gaps around cables and pipes. A leak on an upper floor can present as a stain on a ground-floor wall two rooms away. The visible mark is the destination, not the origin, and the entire job of leak detection is working backwards up that path without demolishing the building to do it.
Safe checks you can do yourself
There are sensible, low-risk observations you can make before calling anyone. None of them involve cutting into the wall, and none should involve going anywhere near electrics or a hot mains.
- Watch and date the stain. Mark the edge of the patch with a light pencil line and note the date. Whether it grows, and how fast, is genuinely useful information.
- Test the weather link. Note whether the stain worsens after rain (pointing to penetrating damp) or after baths and showers (pointing to plumbing).
- Check the meter. Turn off every tap and appliance that uses water and watch the water meter for a period with nothing running. Movement suggests a leak on the supply side, though not all leaks show this way.
- Look at the obvious external suspects. From ground level, check for overflowing or blocked gutters, cracked render, and vegetation against the wall. Do not climb.
- Improve ventilation as a test. If you suspect condensation, ventilating the room and wiping the wall to see whether the problem returns can be quietly revealing.
- Feel and smell. A musty, earthy smell tends to accompany long-standing damp; a fresh, clean water feel with active wetness leans towards a live leak.
What you should not do is start hacking off plaster or lifting floorboards on a hunch. That is how a small investigation turns into a large repair with the source still unfound.
What the forums actually agree on
Anyone who has spent time reading UK home advice communities such as r/DIYUK or r/HousingUK will recognise a few recurring themes, and they are worth repeating because the consensus is sound. The general framing that comes up again and again is this: do not assume the worst-case structural problem, but do not paint over it either. The most upvoted, most repeated advice tends to run along the same lines.
- The first job is always to work out whether the source is live or historic before spending money on repairs.
- Damp meters bought cheaply online are widely regarded as unreliable on their own, prone to false readings on salts and surface moisture, and best treated as a rough indicator rather than proof.
- Rising damp is frequently over-diagnosed, and a great many stains blamed on it turn out to be condensation, penetrating damp or a leak.
- Getting an independent diagnosis of the cause before agreeing to any injected damp-proofing or replastering is the advice that surfaces most consistently, because the treatment is worthless if the real problem is a pipe.
The honest summary of that collective wisdom is that reading a stain yourself gets you a strong hypothesis, but confirming the cause reliably needs proper equipment and method. That is the gap professional leak detection is designed to fill.
How professionals confirm the cause before opening the wall
The core principle of modern leak detection is simple: find the source without damaging the building, and only open up where the evidence points, once. That means combining several non-invasive methods so that no single reading has to carry the whole diagnosis.
Moisture mapping
Rather than taking one meter reading and calling it, moisture mapping builds a picture across the whole affected area. By taking systematic readings over a grid, a technician can see where moisture is highest, how it fades towards the edges, and crucially which direction it is coming from. A leak produces a moisture pattern that points back towards its source; rising damp produces an even band; condensation spreads differently again. The map, not any single number, is what distinguishes the patterns.
Thermal imaging
A thermal imaging camera reads surface temperature, and water changes how a surface holds and loses heat. Evaporating moisture cools a wall, and warm water from a heating pipe warms the material around it. In skilled hands, a thermal camera can trace the shape of a wet area behind intact plaster and follow the run of a warm pipe, revealing the path water is taking without a mark on the wall. It does not see water directly, so it is always read alongside moisture readings rather than in isolation. You can read more about how this works on our thermal imaging leak detection page.
Bringing the methods together
The reason multiple methods matter is that each has blind spots. A meter can be fooled by salts, a thermal camera by draughts and sunlight, a moisture map by an unusual construction. Used together, they cross-check one another, and the point where all the evidence converges is where the wall gets opened, precisely and once. This is also how a live leak is distinguished from settled damp: a leak keeps feeding a moisture signature that behaves like a source, whereas damp presents as a condition of the fabric. That distinction, drawn before any destruction, is the whole value of the exercise. If you want the fuller comparison, our guide on how to tell the difference between damp and a leak goes deeper into the specifics.
Our approach and what it typically costs
We work non-invasively and use more than one method on every visit, because distinguishing settled damp from a live leak is the entire point of calling someone in. We are upfront about that: if the evidence says the cause is damp rather than a plumbing leak, we tell you plainly, so you do not spend money chasing a pipe that was never the problem.
On pricing, we keep it straightforward. We work to a fixed fee agreed at the time of booking, so you know the cost before we arrive, and we operate on a no find, no fee basis for leak detection: if we cannot locate the leak, you do not pay the detection fee. As a general guide, professional leak detection in the UK commonly falls within typical trade cost-guide ranges of roughly £250 to £600 depending on access, property size and complexity, though your fixed quote at booking is what actually applies. You can see the full service on our leak detection in London page.
The message underneath all of it is the same one the forums keep landing on: find out what the stain actually is before you pay to fix it. A wall stain is a clue, not a verdict. Read it carefully, run the safe checks, and when it matters, confirm the cause with proper equipment before a single brick is disturbed.
Frequently asked questions
Is a water stain on my wall always a leak?
No. A stain can be caused by a live plumbing leak, but equally by penetrating damp coming through an external wall, rising damp from the ground, or condensation. The location and behaviour of the stain give strong clues, but the four causes are easy to confuse, which is why confirming the source with moisture mapping and thermal imaging is worthwhile before committing to any repair.
How can I tell the difference between a leak and damp myself?
Watch how the stain behaves. If it worsens after you use a bath, shower or appliance, a plumbing leak is likely. If it darkens after rain and dries out in settled weather, it points to penetrating damp. A low, even tide line near the floor suggests rising damp, while a broad cloudy patch with black mould in cold corners usually means condensation. These are strong indicators rather than proof, so treat them as a working hypothesis.
Why does the stain appear away from where the leak actually is?
Water follows gravity and the path of least resistance through the structure. A leak behind a wall runs down the pipe, along the mortar and behind the plaster before it saturates enough material to show on the surface, often well below and to one side of the fault. This is why opening the wall directly behind a stain frequently reveals dry pipework, and why guessing leads to unnecessary damage.
Are cheap damp meters reliable?
On their own, not really. Inexpensive damp meters are widely regarded as prone to false readings, especially where salts or surface moisture are present, and they are best treated as a rough indicator rather than evidence. Professionals use systematic moisture mapping alongside thermal imaging so that no single reading has to carry the diagnosis, and the methods cross-check one another.
Do you have to break into the wall to find the leak?
Not to find it. The whole aim of non-invasive leak detection is to locate the source using moisture mapping and thermal imaging without damaging the building, then open up precisely at the point the evidence identifies, once. That avoids the trial-and-error demolition that happens when the cause is only guessed at.
What does leak detection cost, and what if you cannot find it?
We work to a fixed fee agreed at the time of booking, so you know the cost before we arrive, and we operate on a no find, no fee basis for leak detection. As a general guide, professional leak detection in the UK typically falls within trade cost-guide ranges of roughly £250 to £600 depending on access and complexity, but your quoted fixed fee at booking is what applies to your job.