What Does a Leak Detection Survey Involve? A Step-by-Step Walkthrough
Booking a leak detection survey and unsure what actually happens? Here is a step-by-step walkthrough of a real visit, from the questions asked at booking through to the insurer-ready report and the repair discussion.
If you have a damp patch spreading across a ceiling, a boiler that keeps losing pressure, or a water bill that has crept up for no obvious reason, someone has probably told you to book a leak detection survey. Fair enough. But what does that actually mean? For most people it is a complete unknown, and the not-knowing is half the worry. Are they going to rip up the floor? How long does it take? What do you get at the end of it, and will your insurer accept it?
This article walks you through a real survey from start to finish, in the order it usually happens. The aim is simple: by the time you have read it, you should know exactly what to expect on the day, roughly how long it takes, and how to prepare so the visit runs smoothly. No jargon, no sales spin, just the honest shape of the job.
What a leak detection survey is actually for
A leak detection survey has one core purpose: to find the exact source of a leak without tearing your property apart to do it. The clue is in the word non-invasive. A good surveyor uses equipment that listens, senses temperature, traces gas or reads moisture through the surface, so that when digging or lifting finally does happen, it happens in one small, correct spot rather than across half a room.
It helps to separate two things that often get muddled. Finding a leak and fixing a leak are different jobs. The survey is the finding. It tells you what is leaking, where, and why. The repair is a separate decision that follows, and we will come back to it near the end. Plenty of people book a survey expecting a plumber to appear, find a dripping joint in ten minutes and mend it. Sometimes the source is that obvious. Often it is buried under a screed floor, behind a tiled wall or beneath a driveway, and the whole reason you are paying for detection is that a normal look-and-poke approach would not find it.
You can read more about the underlying techniques on our page explaining how leak detection works and the methods involved. This article is about the visit itself.
Step one: the questions asked when you book
The survey really starts on the phone or over email, before anyone arrives. A competent detection firm will ask you a set of questions, and it is worth understanding why, because your answers shape how the surveyor prepares and which equipment they load into the van.
Expect to be asked most of the following:
- What are you actually seeing? A damp patch, a puddle, a musty smell, a dropping boiler pressure, a hissing sound, a spike in your water bill. Each symptom points towards a different type of leak.
- Where is it, and where does it appear? Ground floor, upstairs, a flat above or below you, an external wall, under the kitchen. The location narrows the list of suspect pipes.
- How long has it been going on, and is it getting worse? A sudden appearance and a slow creep behave differently and suggest different causes.
- Is it constant or intermittent? Some leaks only show when the heating fires, when a shower runs or when it rains. This is a huge clue and affects when testing is most useful.
- What type of system do you have? Combi boiler, system boiler with a tank, underfloor heating, mains pressure or gravity-fed. Underfloor heating in particular changes the approach.
- What is the construction? Solid concrete floor, suspended timber, tiled wetroom, age of the property, any recent building work. A leak that appeared a month after a new extension is a different investigation to one in a Victorian terrace with original pipework.
- Is this an insurance claim? If so, the report needs to be written to a standard your insurer will accept, and it helps to know that from the outset.
Two things should happen during this conversation. First, a genuine detection specialist will give you a fixed fee for the survey, agreed there and then, rather than an hourly rate that balloons on the day. Second, a reputable firm will operate on a no find, no fee basis for the detection itself, so you are not paying for a fruitless afternoon. If a company will not commit to a price or dodges the no-find question, take that as a signal. Our own approach and fixed pricing are set out on the pricing page.
What to have ready before the visit
You do not need to do much, but a little preparation saves time. Clear access to the areas around the symptom, the boiler and the internal stop tap. Move anything fragile away from a suspected damp wall or floor. If you have them, dig out any paperwork from recent building or plumbing work. And if the leak is intermittent and you have noticed it only shows at certain times, tell the surveyor so they can plan the testing around it.
Step two: arrival and the initial assessment
On the day, the surveyor arrives and the first thing they do is not switch on any clever equipment. They talk to you and they look. This walk-and-talk stage matters more than people expect. You know your home; you have watched the patch grow. Repeat what you told the booking line, point out exactly where the damp is worst, mention anything that has changed since you called.
While you talk, the surveyor is doing a visual assessment: checking the ceilings and walls, looking under sinks and around the boiler, inspecting visible pipework, noting the floor construction and the layout of the plumbing. They are building a mental map of where water could travel, because water rarely surfaces where it escapes. A stain on a bedroom ceiling can come from a pipe several metres away, running downhill along a joist before it finally drips through. The initial assessment is about forming a short list of suspects rather than jumping to conclusions.
Step three: confirming there is a leak, and isolating it
Before hunting for a precise location, a good surveyor confirms that a leak exists at all and works out which part of the system it belongs to. This is the least glamorous stage and the most important. Skipping it is how people end up with a hole in the wrong wall.
The water meter check
If your property is metered, the surveyor turns off every water-using appliance and watches the meter. A meter that keeps ticking over with nothing running is strong evidence of a leak on the supply side. If the property has a leak indicator dial, even a slow creep tells a story.
Pressure testing
Pressure testing is the backbone of confirmation. The principle is straightforward: seal off a section of pipework, pressurise it, and watch whether the pressure holds. If it drops, that section is leaking. If it holds, that section is sound and can be crossed off.
The clever part is doing this per circuit. Rather than testing the whole system as one lump, the surveyor isolates individual circuits or zones and tests them one at a time. On a heating system that might mean testing the flow and return separately, or isolating an underfloor heating manifold loop by loop. The goal is to move from a vague there is a leak somewhere to a specific it is on the cold feed to the bathroom, on this loop, losing pressure at this rate. That isolation is what turns a whole-house problem into a one-metre search area.
Thermal and moisture checks alongside
While the pressure tests run, the surveyor often begins scanning with a thermal imaging camera and a moisture meter to build a picture of where water has actually spread. None of these readings prove anything on their own, but together they start to converge on a location.
Step four: applying the detection methods
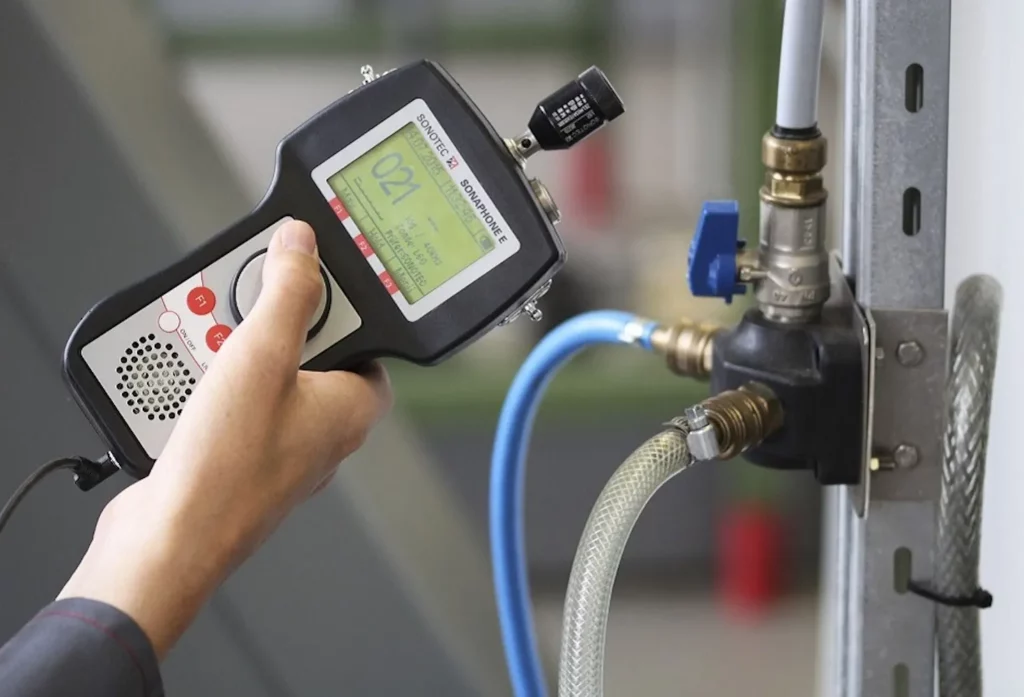
Once the leak is confirmed and isolated to a circuit, the surveyor switches to pinpointing. This is where the specialist equipment earns its keep. No single method finds every leak, which is exactly why a proper survey is multi-method. The surveyor chooses the tools that suit the leak type, the surface and the readings gathered so far. Here is what each does and when it comes out of the van.
| Stage / method | What happens | Best suited to |
|---|---|---|
| Acoustic detection | Sensitive ground microphones and amplifiers listen for the hiss or drip of water escaping under pressure, often through solid floors or walls. | Pressurised pipes under screed, concrete or below ground. |
| Thermal imaging | An infrared camera maps surface temperature differences, revealing the cool trail of a fresh leak or the warm run of a hot pipe leak. | Underfloor heating, hot-water leaks, tracing pipe routes. |
| Tracer gas | A safe hydrogen and nitrogen mix is introduced into the drained pipe. The gas escapes at the leak and is picked up at the surface by a gas detector. | Pinpointing when acoustic methods are inconclusive, and very small leaks. |
| Moisture mapping | Moisture meters and hygrometers measure damp levels across surfaces to map how far water has travelled and where it is heaviest. | Confirming spread, distinguishing an active leak from historic damp. |
| Salts and damp diagnosis | Readings and observations help separate a plumbing leak from rising damp, penetrating damp or condensation. | Cases where the cause of dampness is genuinely unclear. |
In practice the surveyor moves between these. They might hear a promising signal on the acoustic microphone, confirm a cool patch with the thermal camera, then introduce tracer gas to nail the exact spot to within a few centimetres. The methods back each other up. A fuller explanation of each technique lives on our methods page if you want the detail.
Step five: cross-confirming before anyone lifts a floor
Here is the discipline that separates a good survey from a guess. Before marking anything as the source, the surveyor looks for agreement between at least two independent methods. Acoustic and tracer gas pointing to the same spot. Thermal and moisture readings peaking in the same place. Pressure test isolating the circuit that those readings sit on.
Why bother? Because the whole value of detection is avoiding unnecessary damage. If you commit to a location on a single ambiguous reading and you are wrong, you have opened a floor for nothing and you still have a leak. Cross-confirmation is what lets the surveyor say, with confidence, that the leak is here and not there. It is slower and it is the entire point.
Step six: marking the leak
Once the source is confirmed, the surveyor marks it physically on your floor or wall, usually with tape or a marker, and records the position with measurements and photographs. This matters for whoever carries out the repair, whether that is the same firm on another visit or your own plumber. A precise mark means the access hole is cut in the right place and kept as small as possible.
Step seven: the report you receive
The tangible output of the survey is the report. A professional detection report should give you a clear, standalone account that someone who was not there can understand and act on. Expect it to include:
- A description of the symptoms and what you reported.
- The tests carried out, including meter readings and pressure test results.
- The detection methods used and what each one found.
- The confirmed location of the leak, with photographs and measurements.
- The likely cause and the surveyor's assessment of the pipe or fitting at fault.
- Recommendations for the repair and any make-good work.
If your claim involves insurance, the report should be written to be insurer-ready, meaning it documents the evidence in the form loss adjusters expect. This is often the single most useful thing you take away, because a well-evidenced report is what unlocks a trace-and-access claim, where the insurer covers the cost of finding and reaching the leak. It is worth checking your policy for that clause before you book.
Step eight: the repair or make-good discussion
With the leak found, marked and documented, the conversation turns to what happens next. This is a decision, not an automatic step. Broadly you have a few routes: the detection firm carries out the repair if they offer that service, you arrange your own plumber armed with the precise report, or, for a leak inside a wall or under a floor, the fix involves cutting access, repairing the pipe and then making good the surface afterwards.
A straightforward joint or a short section of pipe can sometimes be repaired the same day. A leak under a solid floor is a bigger job involving breaking out screed, repairing and reinstating, and that is usually planned as separate work. A good surveyor will talk you through the realistic options and be honest about what the make-good will involve, rather than glossing over the reinstatement. If you would like the same team to handle both finding and fixing, our London leak detection service covers detection through to repair.
How long does it take, and what does it cost?
Most residential surveys take somewhere between one and three hours on site. A clear-cut leak on an accessible pipe can be found quickly. A stubborn intermittent leak, a large property or a complex underfloor system takes longer, partly because some tests need time to run and be observed properly. Anyone promising to be in and out in fifteen minutes is not doing the isolation and cross-confirmation that make the result reliable.
On cost, typical UK trade cost-guide ranges for a professional leak detection survey tend to sit in the region of a few hundred pounds for a standard residential visit, with the exact figure depending on property size, access and complexity. The important points are that a reputable firm agrees this as a fixed fee at booking, so there are no surprises, and that it applies on a no find, no fee basis for the detection. Repairs and make-good are quoted separately once the source is known, because you cannot sensibly price a repair before you know what and where the fault is. Our current fixed pricing is on the pricing page.
What the honest forum consensus says
If you spend any time reading through DIY and home-improvement forums such as r/DIYUK or DIYnot, a fairly consistent picture emerges from people who have been through this. A few themes come up again and again, and they are worth passing on plainly.
The first is that chasing a hidden leak yourself is a well-known route to frustration and unnecessary damage. Many people describe lifting floorboards, drilling exploratory holes or replacing fittings on a hunch, only to find the real source somewhere else entirely. The general view is that once a leak is genuinely hidden, specialist detection usually costs less than the damage caused by guessing.
The second recurring point is that not everyone advertising leak detection carries the same kit or works to the same standard. The community consensus leans towards asking which methods a firm actually uses, and being wary of anyone relying on a single tool. A multi-method approach with cross-confirmation is what people report being satisfied with.
The third theme is insurance. A lot of the practical advice on these forums centres on checking your policy for trace-and-access cover and making sure any survey produces a proper written report, because that documentation is what claims tend to hinge on. None of this is a substitute for professional advice on your specific situation, but the collective experience points the same way: confirm the leak properly, use more than one method, and get it in writing.
The short version
A leak detection survey is a structured, non-invasive investigation. It begins with the right questions at booking, moves through a careful visual assessment, confirms and isolates the leak with meter and per-circuit pressure testing, pinpoints it using acoustic, thermal, tracer gas and moisture methods, cross-confirms the location before anyone lifts a floor, marks the spot, and hands you an insurer-ready report. The repair is a separate, informed decision that follows. Booked with a firm that agrees a fixed fee and works no find, no fee, it takes the guesswork, and most of the damage, out of finding a hidden leak. If you are ready to arrange one, take a look at our leak detection service across London.
Frequently asked questions
How long does a leak detection survey take?
Most residential surveys take between one and three hours on site. A clear-cut leak on an accessible pipe is found quickly, while a stubborn intermittent leak, a large property or a complex underfloor heating system takes longer because some pressure tests need time to run and be observed properly.
Is a leak detection survey invasive? Will you damage my property?
The survey itself is non-invasive. The equipment listens, senses temperature, traces gas and reads moisture through surfaces, so nothing is cut or lifted to find the leak. The whole point is that when access is eventually needed for the repair, it happens in one small, correctly identified spot rather than across a whole room.
What if you cannot find the leak?
A reputable detection firm operates on a no find, no fee basis for the survey itself, so if the leak is not located you are not charged for the detection. It is worth confirming this at the point of booking, along with the fixed fee, before any visit is arranged.
How much does a leak detection survey cost?
Typical UK trade cost-guide ranges put a standard residential survey in the region of a few hundred pounds, depending on property size, access and complexity. A good firm agrees this as a fixed fee at booking rather than charging by the hour. Any repair and make-good work is quoted separately once the exact source is known.
Will my insurance cover a leak detection survey?
Many home insurance policies include trace-and-access cover, which pays for finding and reaching a leak. A well-evidenced, insurer-ready report is usually what a claim hinges on, so it helps to check your policy for that clause and to tell the surveyor at booking that the work relates to a claim.
Do you repair the leak as well as find it?
Finding and fixing are separate steps. Once the source is confirmed and marked, you can have the detection firm carry out the repair if they offer that service, or use your own plumber armed with the precise report. A straightforward pipe or joint can sometimes be mended the same day, while a leak under a solid floor is usually planned as separate access and make-good work.